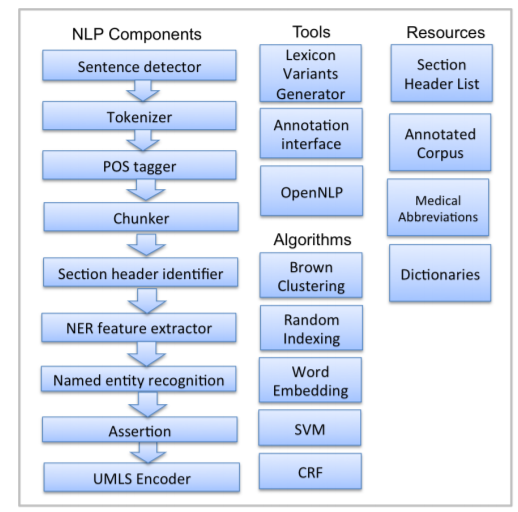
The CLAMP System is a comprehensive clinical Natural Language Processing software that enables recognition and automatic encoding of clinical information in narrative patient reports. In addition to running a clinical concept extraction pipeline as well as an annotation pipeline, the individual components of the system can also be used as independent modules. The system lends itself for diverse applications in a broad range of clinical domains. The high performance language processing framework in CLAMP consists of the following key building blocks:
CLAMP components builds on a set of high performance NLP components that were proven in several clinical NLP challenges such as i2b2 , ShARe/CLEF , and SemEVAL. A pipeline can be created and customized by a simple drag and drop on the individual CLAMP components in the order that is desired. Upon creation of the pipeline, CLAMP checks for errors in sequence and directs the user to the appropriate logical order with insertion of the required components for a working pipeline. The CLAMP components are supported by knowledge resources consisting of medical abbreviations, dictionaries, section headers, and a corpus of 400 annotated clinical notes derived from MTsamples, a freely available resource of clinical narrative text. CLAMP also provides built-in pipelines ready for use out of the box for a series of common clinical applications.
The CLAMP framework provides alternative components for some tasks, utilizing rule based methods and/or machine learning methods such as support vector machines, and conditional random fields. These components can be customized by re-training on an annotated corpus, or editing the rule sets within the CLAMP GUI to achieve a custom NLP task. The CLAMP GUI version also provides built-in functionality to test the model, using the annotated corpora or n-fold cross validation.
The user interface also provides required tools to maintain and annotate text corpora. It hosts an improved version of the brat annotation tool (reference?) for textual annotations.
CLAMP is a stand-alone Java application based on the Eclipse platform technologies. CLAMP uses the Apache UIMA (Unstructured Information Management Architecture) framework. The annotation module of CLAMP incorporates and enhances the brat rapid annotation tool . For the other individual constituents, Apache OpenNLP toolkit, Liblinear and CRF Suite are utilized in addition to in-house rule-based components. CLAMP also use the UIMA Ruta (Rule based Text Annotation) as a rule engine to help users specify rules. CLAMP is distributed as a ready-to-use binary package that can either be executed at the command line or carries the associated Graphic User Interface (GUI). Our distribution package includes components for jar files, CRFSuite, and a Lucene index of all levels of UMLS data.
The only prerequisite necessary to compile CLAMP is JRE 1.8 (Java Runtime Environment).
Please ensure that you have Java 8 or higher installed in your system. Run the following
command in both Mac and Windows to check your version:
java –version
Here is an example of what you will see when running the command in Windows:
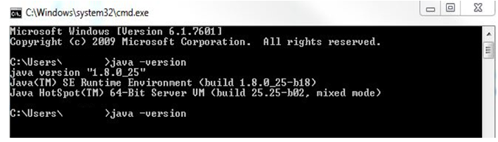
If your java version is not 1.8, it is available for download from the Oracle website. An UMLS account is required in order to use Level 2 and higher data in the UMLS encoding component of the system. The account can be created at https://uts.nlm.nih.gov/home.html. You will have to enter your UMLS username and password when prompted by CLAMP in order to utilise the UMLS encoding component. CLAMP also uses the computer’s default browsers to visualize the clinical documents. Since all browsers do not completely support all the aspects of the technologies used to implement the visualization, limitations exist in term of running the CLAMP annotation module in the browsers. On the Windows OS, the Internet Explorer should be higher than IE9; On Macintosh computers, Safari (all versions) works well with CLAMP.
The CLAMP System is provided as a .zip file. After downloading the compressed file, unzip the package in the directory of choice and voila!! the system is ready for use. Installation instructions are the same for both Windows and Macintosh computers. For the CLAMP command line version please refer to the readme file.
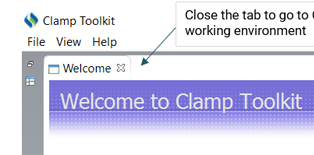
You can run the GUI version of CLAMP by double clicking on the startCLAMP icon. Once the software is completely loaded, you will notice a welcome tab. Close the tab to go to CLAMP working environment
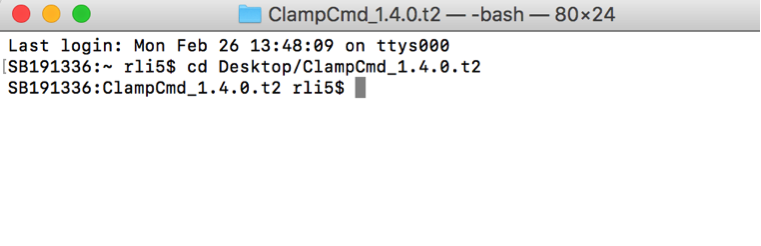
./activation.sh in Terminal, enter your email address and SN which
registered in CLAMP website and the activation code your received from CLAMP team. ./run_ner_pipeline.sh in Terminal. ./run_attribute_pipeline.sh in Terminal .\activation.bat in Command Prompt, enter your email address and
SN which registered in CLAMP website and the activation code your received from CLAMP team. .\run_ner_pipeline.bat in Command Prompt..\run_attribute_pipeline.bat in Command Prompt. Since CLAMP is a stand-alone eclipse plugin, its folder structure is similar to other
eclipse plugins.
Configuration Folder:
This folder contains CLAMP configuration files.
StartCLAMP:
This is the launching point for the CLAMP GUI. In Windows,
this is an executable file while in Mac, this is an application.
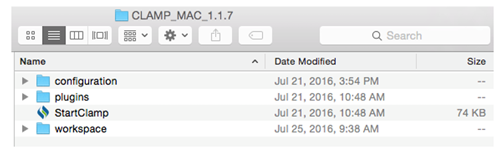
This folder contains seven sub-folders:
If you want to use UMLS terminologies,
then you will need to create an UMLS account. Please follow the following link
to create an UMLS account if you do not have any.
https://uts.nlm.nih.gov//license.html
The following table lists libraries included in CLAMP.
| groupId | artifactId | version |
|---|---|---|
| org.cleartk | cleartk-ml-liblinear | 2.0.0 |
| org.ini4j | ini4j | 0.5.2 |
| org.apache.uima | uimafit-core | 2.1.0 |
| com.google.code.gson | gson | 2.3 |
| org.apache.uima | uimaj-core | 2.6.0 |
| org.apache.uima | uimaj-document-annotation | 2.6.0 |
| de.bwaldvogel | liblinear | 1.94 |
| org.apache.lucene | lucene-core | 5.2.1 |
| org.apache.lucene | lucene-analyzers-common | 5.2.1 |
| org.apache.lucene | lucene-queryparser | 5.2.1 |
| org.apache.opennlp | opennlp-tools | 1.5.1-incubating |
| org.apache.ctakes | ctakes-type-system | 3.2.0 |
| org.cleartk | cleartk-named-entity | 0.6.6 |
| com.googlecode.clearnlp | clearnlp | 1.3.1 |
| commons-codec | commons-codec | 20041127.091804 |
| dom4j | dom4j | 1.6.1 |
| org.apache.uima | ruta-ep-engine | 2.3.0 |
| javax.servlet | servlet-api | 3.0-alpha-1 |
| com.sun.jersey | jersey-client | 1.19 |
| junit | junit | 4.12 |
| commons-cli | commons-cli | 1.3 |
| net.jodah | concurrentunit | 0.4.2 |
| org.javatuples | javatuples | 1.2 |
On Windows, simply copy contents of your previous work folder (i.e. from older Clamp_x.xx.xx_win\workspace\MyPipeline\ contents to new Clamp_x.xx.xx_win\workspace\MyPipeline\ contents) using Windows Explorer and restart CLAMP if it’s already running. On startup, CLAMP will recognize these projects and import them into your workspace.
On MacOSX, similarly copy contents of your previous work folder (i.e. from older Clamp_x.xx.xx_win/workspace/MyPipeline/ contents to new Clamp_x.xx.xx_win/workspace/MyPipeline/ contents) using Finder and restart CLAMP if it’s already running. On startup, CLAMP will recognize these projects and import them into your new workspace.
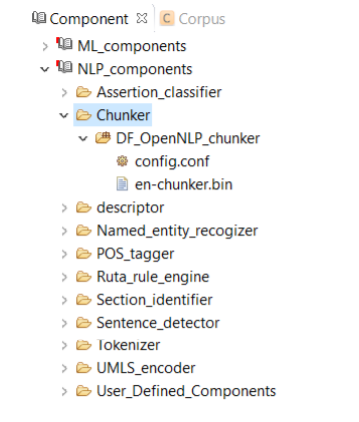
NLP components are used for processing text. CLAMP offers multiple NLP components that are the building blocks for performing any of the NLP tasks. The individual components are provided as pre-built modules that are to be used in building pipelines for automatic text processing, as well as training customized machine learning models. The following picture displays the CLAMP NLP components, as well as its associated tools, algorithms and resources. In this section, we will provide details about each NLP component including their function as well as ways to customize them using your own dictionary/model. In "Build a Pipeline" section, we have tutorials that touch on use cases wherein the components are utilized in various applications.
A sentence is defined as the longest whitespace trimmed character sequence between two punctuation marks. A Sentence Detector utilizes different methods to detect a sentence. As shown in picture below, CLAMP provides three different models to detect a sentence:
Each model is described in details in the following sections.
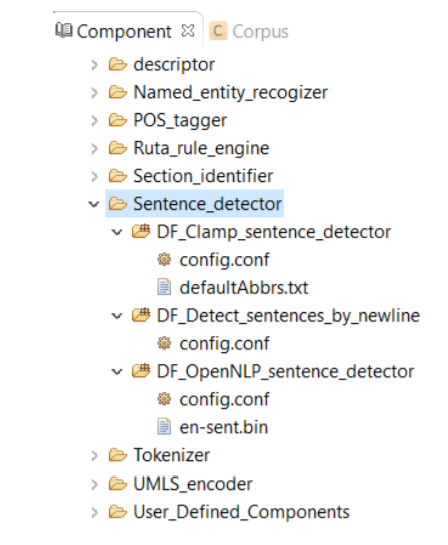
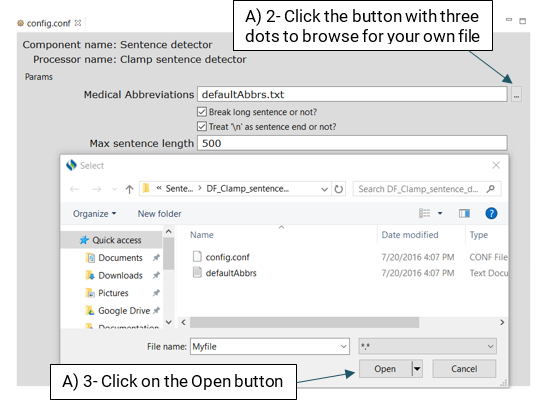
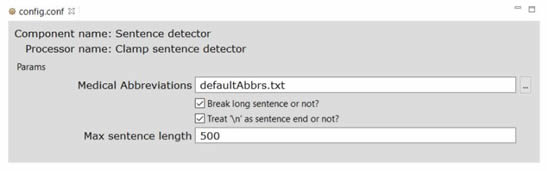
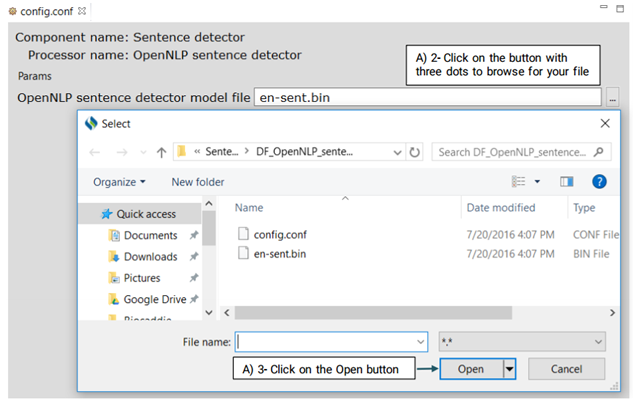
DF_CLAMP_Sentence_Detector is the default sentence detector in CLAMP. It is designed specifically for clinical notes and takes into account the distinctive characteristics observed in sentences found in clinical texts. To configure the DF_CLAMP_Sentence_Detector, please click on the config file. A pop-up window opens where you can modify two parameters: Medical Abbreviation, and Max Sentence Length.
There are some medical abbreviations that have punctuation marks at their beginning (".NO2) while some of them have it at the end (spec.). Providing a list of such abbreviations would help the detector to identify sentences more accurately. By default, CLAMP has provided a comprehensive list of medical abbreviation which can be found in this file: defaultAbbrs.txt
Checking the checkbox for "Break long sentences or not?" allows users to break long sentences into the number of words that they have specified in the input textbox. Please refer to the following picture for more information.
This detector will identify new sentences using the line breaks in the file, i.e., each line in the file is treated as a single sentence.
This is an OpenNLP sentence detector which advanced users can use its config.conf file to change its default model.
A Tokenizer segments the text into a sequence of tokens. As shown in Figure 8.4, CLAMP provides three different models of tokenizer:
Each model will be described in more details.

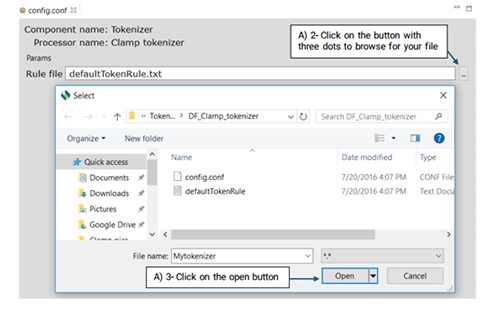
DF_CLAMP_Tokenizer is the default tokenizer designed specifically for clinical notes. Advanced users can use the config.conf file to change the default tokenization.
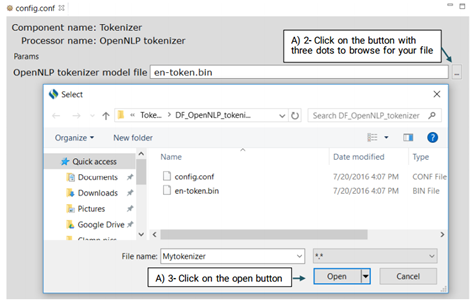
This is an OpenNLP tokenizer. Advanced users can use its config.conf file to change its default model, en-token.bin.
This tokenizer uses the spaces in a sentence to separate the tokens.
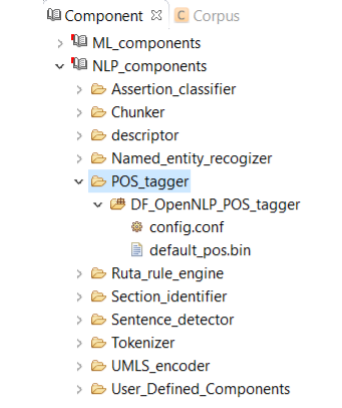
A Pos tagger allows users to assign parts of speech to each token. As shown in Figure 8.5, CLAMP currently provides only one pos tagger, DF_OpenNLP_pos_tagger, designed specifically for clinical text. This tagger is built from re-training the OpenNLP pos tagger on a dataset of clinical notes, namely, the MiPACQ corpus. (http://clear.colorado.edu/compsem/index.php?page=endendsystems&sub=mipacq) . Advanced users can use the config.conf file to change the default pos tagger modelmipacq_pos.bin.
A chunker does a shallow parsing of a sentence and identifies the syntactic constituents such as noun phrases, verb phrases, and etc. As shown in Figure 8.6, CLAMP currently provides only one single chunker, DF_OpenNLP_chunker, which is a wrapper of the chunker in OpenNLP. Advanced users can use the config.conf file to change the default chunker model- en-chunker.bin.
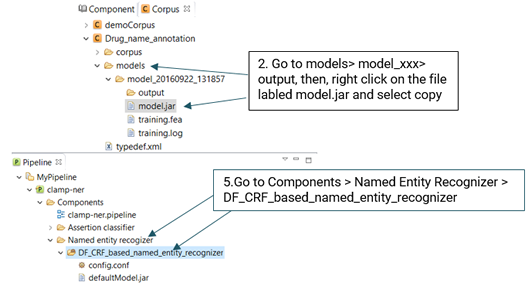
A named entity recognizer identifies named entities and their semantic types in text. Typically, named entities refer to clinical concepts in CLAMP. As shown in Figure below, CLAMP provides two different models for named entity recognition:
Each model will be described in more details.
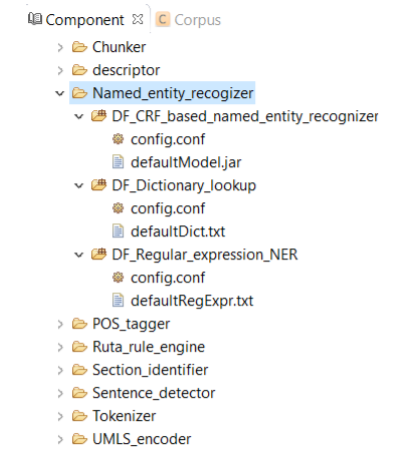
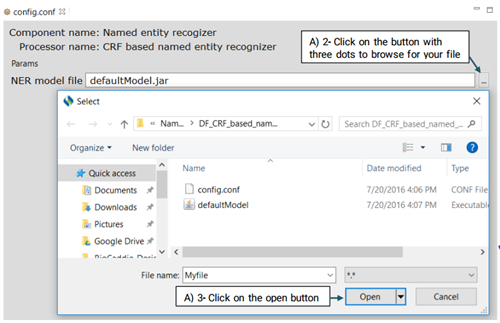
DF_CRF_based_named_entity_recognizer is the default named entity recognizer used in
CLAMP. The recognizer identifies three types of clinical concepts:
Problems, treatments, and tests.
It is built from training the CRF model on a dataset of clinical notes, namely, the i2b2
2010
challenge corpus (https://www.i2b2.org/NLP/Relations/).
Advanced users can use the
config.conf file to change the default recognizer model as in the file defaultModel.jar.
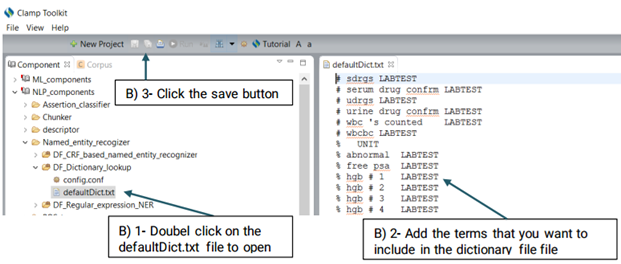
DF_Dictionary_lookup uses terms in the dictionary to match them directly with
the identified named entities. Currently the defaultDic.txt used in CLAMP consists of
terms and their semantic types from UMLS
(https://www.nlm.nih.gov/research/umls/)
. The semantic type of the matched term in UMLS is assigned to the recognized named
entity.
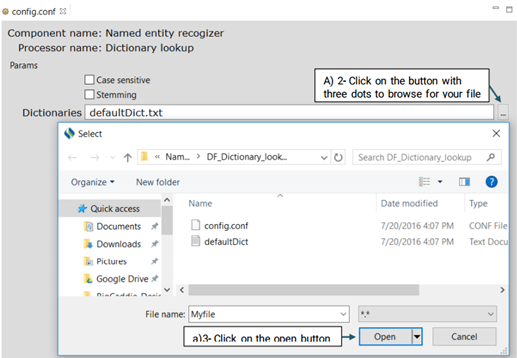
To configure DF_Dictionary_lookup:
First, click on the config file under the DF_Dictionary_matcher folder. This will open
up a
new window that takes the following three parameters: Case sensitive, Stemming and
Dictionaries.(Shown in the picture below)
Case sensitive
If you check the checkbox for "Case sensitive", the matcher will differentiate between
capital and lowercase letters when searching for a term in the dictionary. For example,
"Breast Cancer” will not matched with "breast cancer".
Stemming
If you check the checkbox for "Stemming", the matcher will match the stemmed form of a
candidate named entity with the terms in the dictionary. For example, "breast cancers"
will
be matched to "breast cancer".
Dictionaries
You can also replace or edit the dictionary file suggested for this function.
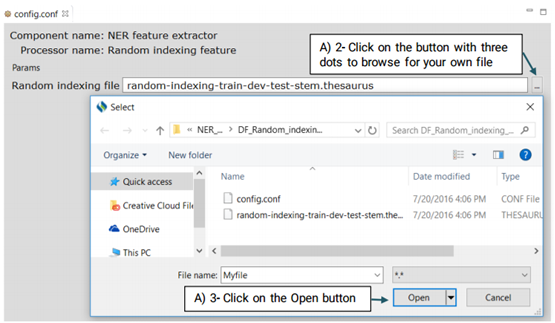
Using the defaultRegExpr.txt file, this module can identify named entities. defaultRegExpr.txt file can contain several regular expression. If a phrase matches a regular expression, it is recognized as a named entity. You can add your own regular expression to the existing file by double clicking the file and add the items that you want to include.
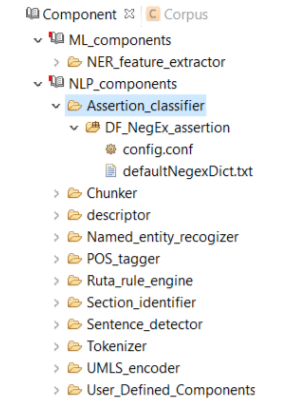
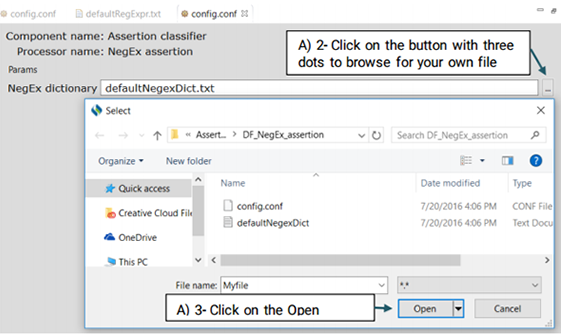
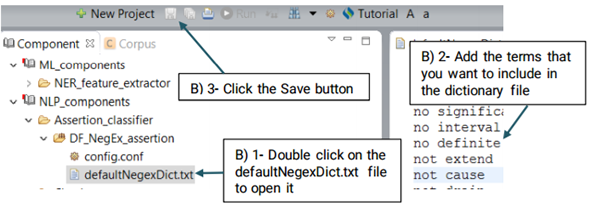
An Assertion identifier checks whether there is a negation related to a specific clinical concepts in the text. A negation means the absence or opposite of something positive. CLAMP Assertion Identifier provides a mechanism to examine the real-world implications of annotations in a given clinical text. The defaultNegexDict.txt file which contains common negation patterns is used by CLAMP to check for negation in a clinical text. You can either replace or edit this file by following the steps below. (See the picture below)
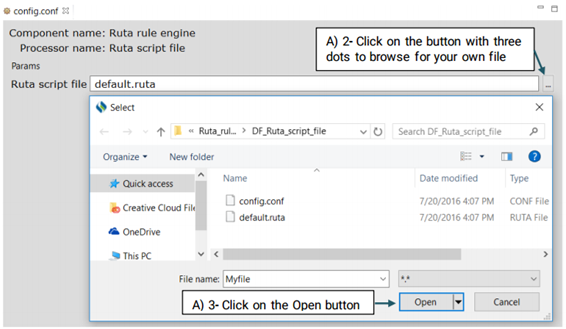
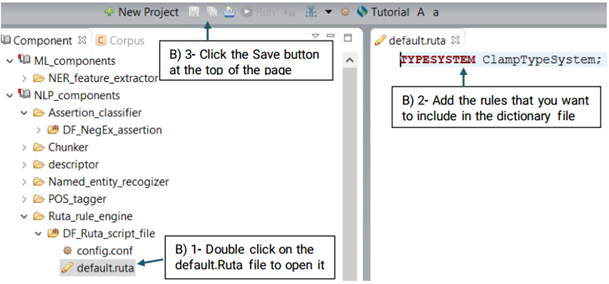
UIMA Ruta rules can be used to create or modify annotations as well as create features for annotations. Ruta rules in general can consist of a sequence of rule elements. A simple rule elements consist of four parts: A matching condition, an optional quantifier, an optional list of conditions and an optional list of actions. For more information please visit: https://uima.apache.org (See the picture below)
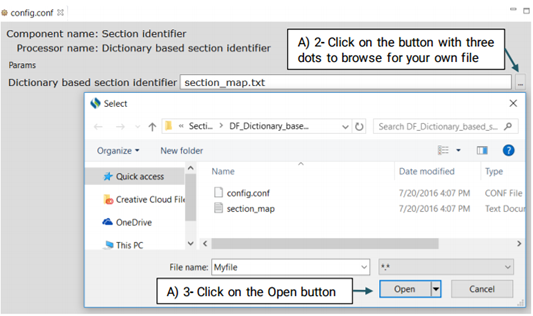
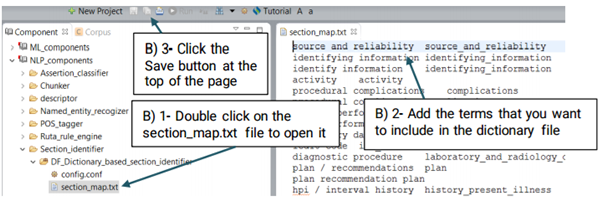
The section header identifier component identifies the section headers in a clinical note based on a predefined dictionary and categorizes them into general categories (Figure below). E.g. the section header "ICD 10 code" will be assigned to the "icd_code" category.
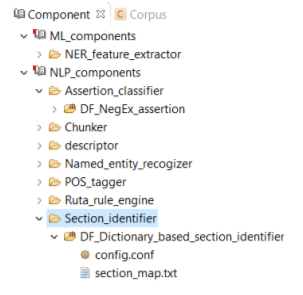
You can replace or edit the default dictionary, section_map.txt, following the steps below:
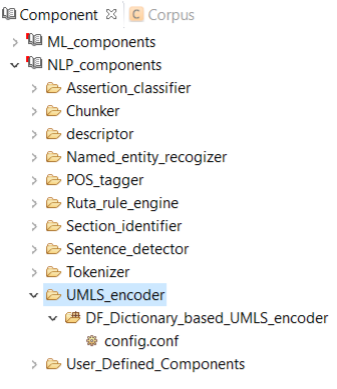
A UMLS Encoder matches the terms of clinical concepts to its corresponding CUIs in UMLS. For example, the term "breast cancer" will be encoded into the CUI of "C6006142" in UMLS. Currently CLAMP provides a default dictionary based on the UMLS encoder as shown in figure below
DF_Drug_Attribute_Connector:
This is a context free grammar parser which is extracted from Medex. It is used to connect
medication to its possible attributes such as dose.
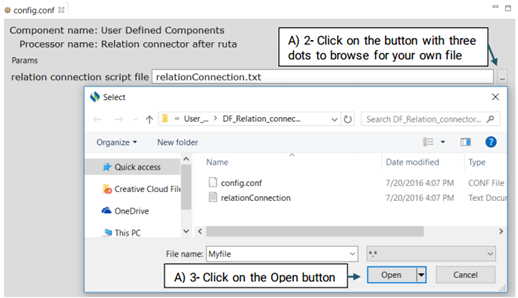
DF_Relation_connector_after_ruta:
While connecting two named entities using Ruta is relatively easy, it can not be used to
provide a name for that relationship.
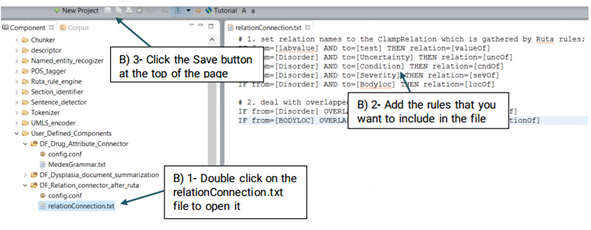
Advanced users can generate their own file and replace it with the system’s default file or
edit the default file.
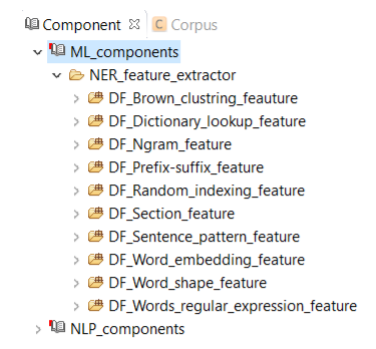
This component consists of different feature extractors (Figure 9.1), which are used for extracting different types of features for named entity recognition, CLAMP users will use this component to build their own named entity recognizer in a corpus annotation project (Refer to Section 4.2) . Similar to the previous components, we can customize these features by changing or replacing their default config files. Explanation of each extractor is as follows:
It is a type of word representation feature generated on the unlabeled data which is provided by the SemEval 2014 Challenge. Advanced users can eplace their own Brwon clustering file with the system’s default file.
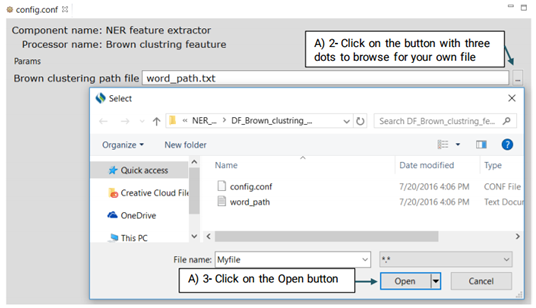
For more information on how to create your own Brown Clustring file visit:
https://github.com/percyliang/brown-cluster
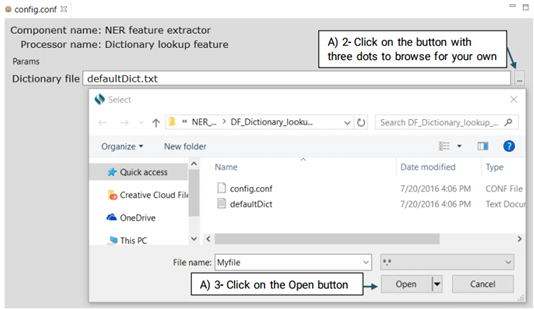
This extractor uses a dictionary consisting of terms and their semantic types from UMLS to
extract potential features.
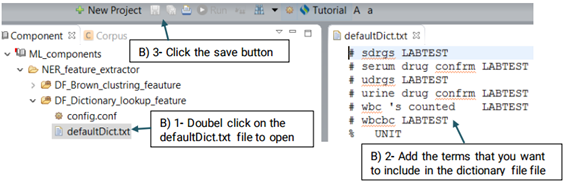
Advanced users can replace or edit the default file following the steps below:
Note:The format of the content should be as the same as the default file:
(phrase then tab
then semantic type)
This module uses the words along with their part-of-speech (pos) tagging as NER features.
This function extracts the prefix and suffix of words that may be a representative of a specific type of named entities.
Similar to the brown clustering, it is a type of word representation feature generated on unlabeled data using a 3 rd party package. For more information visit: https://jcheminf.springeropen.com
This function extracts the section in which a candidate named entity presents.
This function distinguishes the pattern of a sentence by CLAMP built in rules.
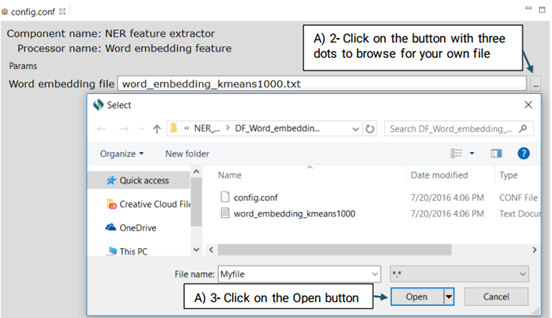
Similar to the brown clustering and random indexing, it is a type of distributed word representation feature generated on the unlabeled data (MIMIC II) provided by the SemEval 2014 Challenge using a neural network.Advanced users can replace the default file with their own file.
This function extracts the type of a word; it identifies whether or not it begins with an english letter, number, and etc.
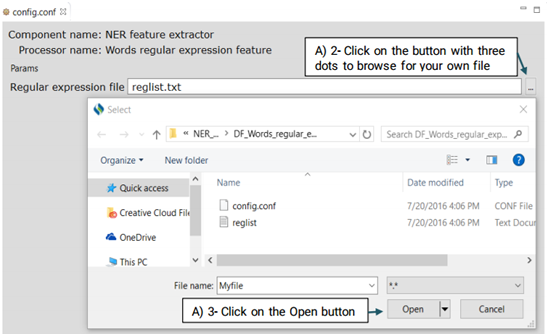
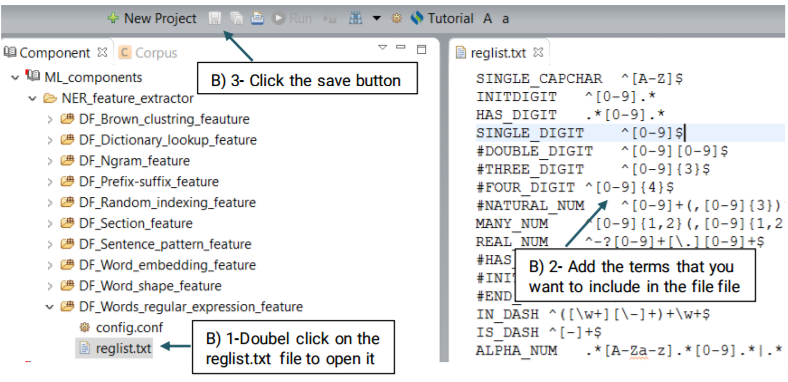
This function extracts the regular expression patterns of words that may indicate a specific type of named entity. Advanced users can create their own regular expressions or edit the default file
Running a pipeline refers to the use of a set of NLP components to identify the specified
information , including sentence segmentation, tokenization, part of speech tagging,
abbreviations, etc. The NLP components are executed in a sequence based on the
functional dependency amongst them.
In order to recognize clinical concepts within clinical text:
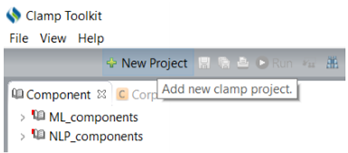
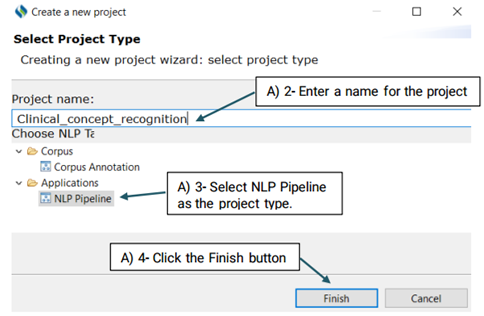
Follow the steps below to build a pipeline:
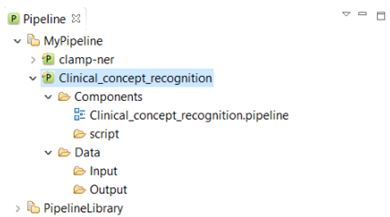
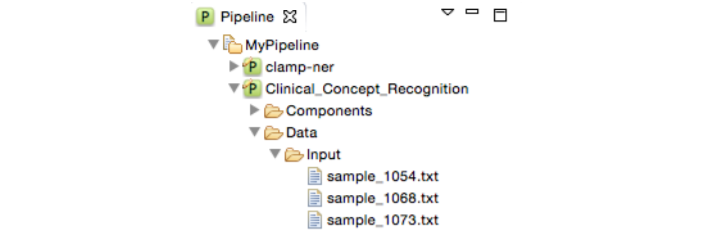
Double click the pipeline name to view its content. As you can see, it contains two folders "Components", and "Data". The Components folder contains the pipeline configuration file. The Data folder includes two folders: Input, and Output. The Input folder holds the files that are processed by the pipeline. The results obtained by running the pipeline are saved in the output folder.
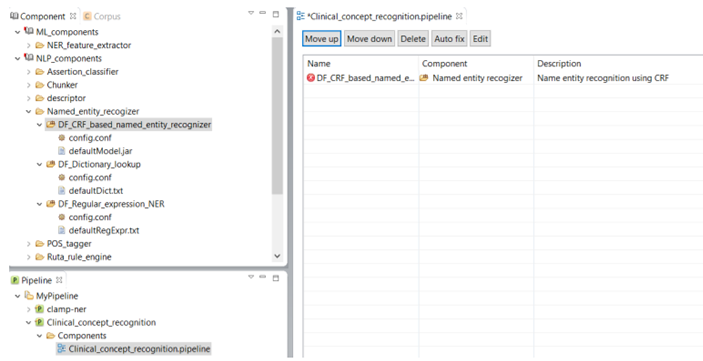
To configure a pipeline double click on the .pipeline file from the newly created pipeline project to open it in the middle window on the screen. Here you can drag and drop the NLP components from the Component panel. Since we want to recognize clinical concepts using NLP components, we drag the DF_CRF_based_name_entity_recognizer from the NLP_components to the pipeline.
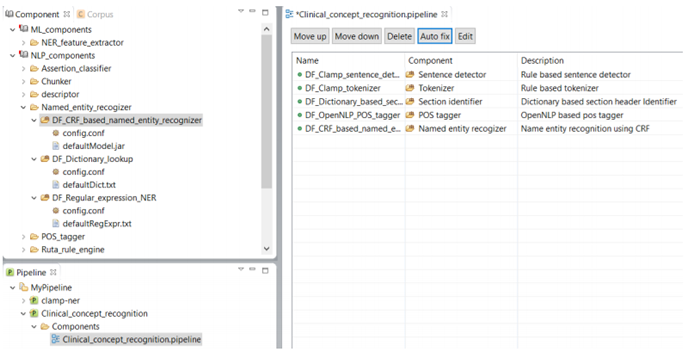
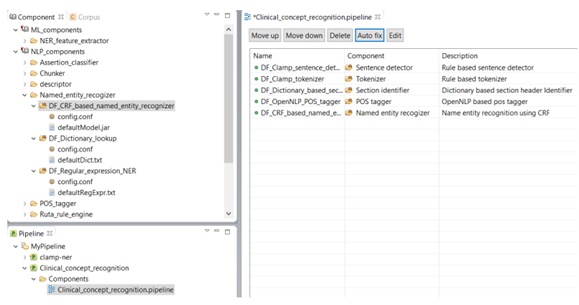
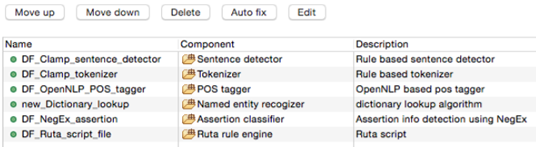
As shown in the figure below, there is a red X sign in front of the newly added component, "CRF based named entity recognizer". This sign indicates that the named entity recognizer component is dependant on other NLP components that are missing from the current pipeline. In our example, the clinical notes first need to be processed by the sentence detector, tokenizer, section identifier, and POS tagger components before processing by the named entity recognizer. To fix this issue, simply click on the Auto fix button at the top of the panel. This automatically adds the required components to the pipeline. The sequence of the individual components from top to bottom reflect the order in which they will run to process your input data. After the required components are added (figure below), the red X sign changes to the green circle sign indicating the accuracy of the order of the components. Once you see the green sign for each of the displayed NLP components, click on the Save button at the top of the screen to save your changes.
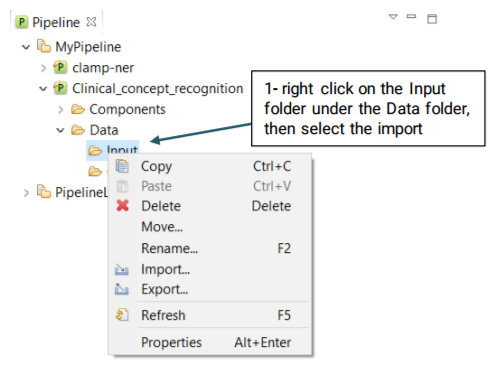
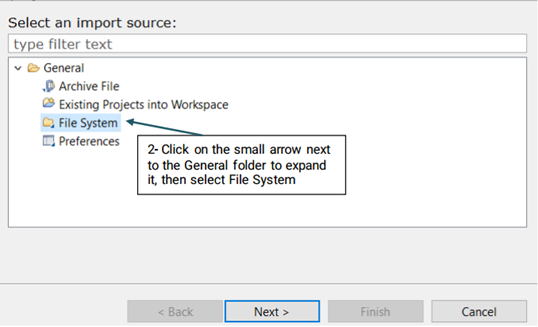
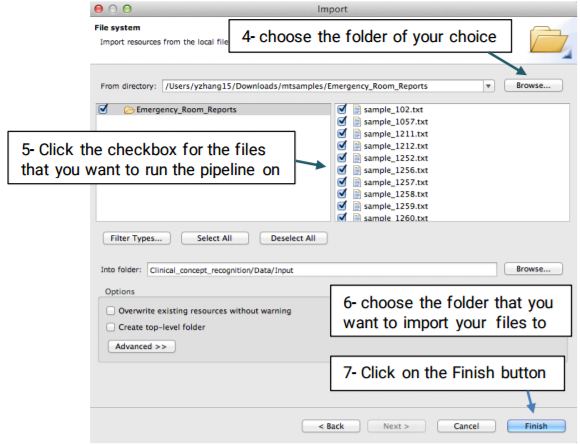
Once the pipeline is configured, you will need to import your desired files to the Input folder using the the following steps:
Now, you can double click on the Input folder to see the imported files
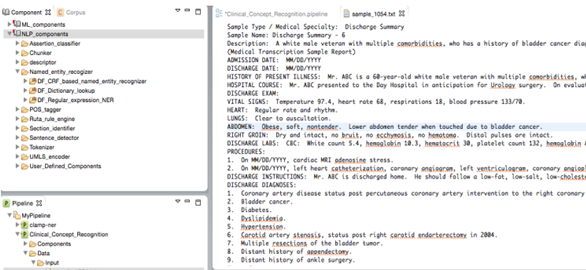
Similarly, you can also double click on each file to view its content (figure below).
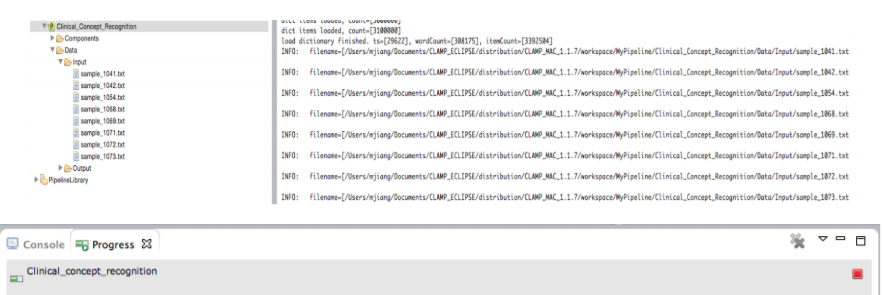
After you have configured the pipeline and imported the input files, you can start running the pipeline. To run a pipeline, simply click on the run icon at the top of the screen as shown in the figure below.
Once the pipeline starts running, you can check the progress of the input file processing from the Console window and the progress bar at the bottom of the screen. You can always stop the processing at anytime by clicking on the red stop button next to the progress bar.
Once running the pipeline is completed, the generated files are displayed in the Output
folder. These files can be viewed in two different formats (.xmi , .txt):
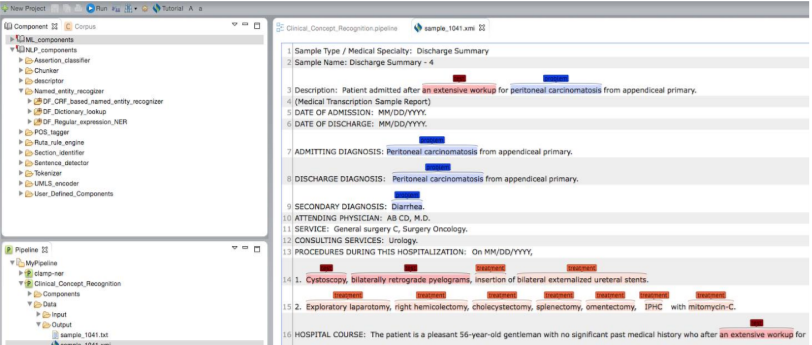
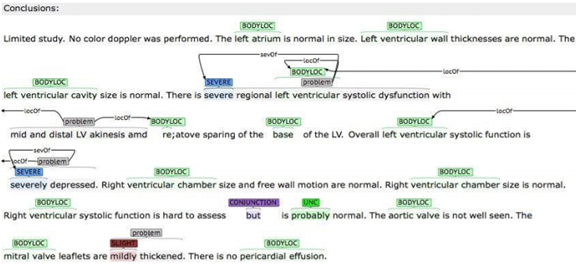
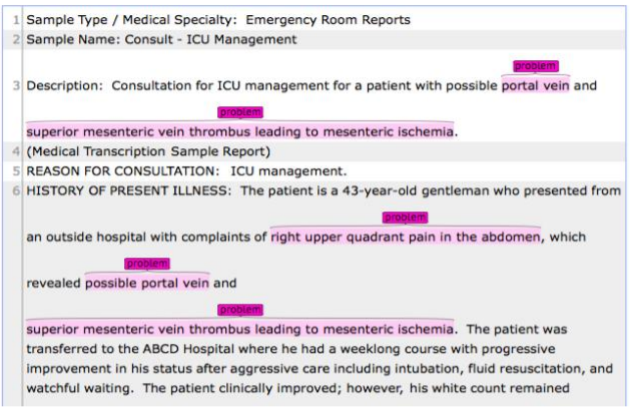
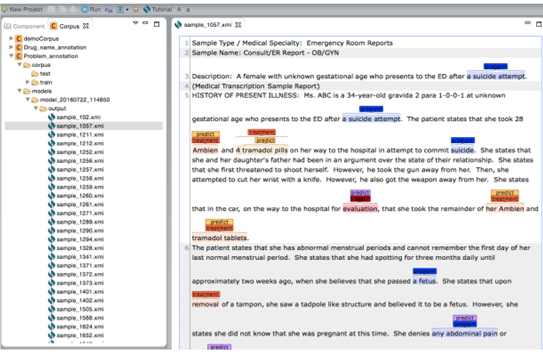
Clicking on a file with the .xmi extension allows you to view its original content
annotated with recognized clinical concepts. Different types of clinical concepts will be
highlighted with different colors.
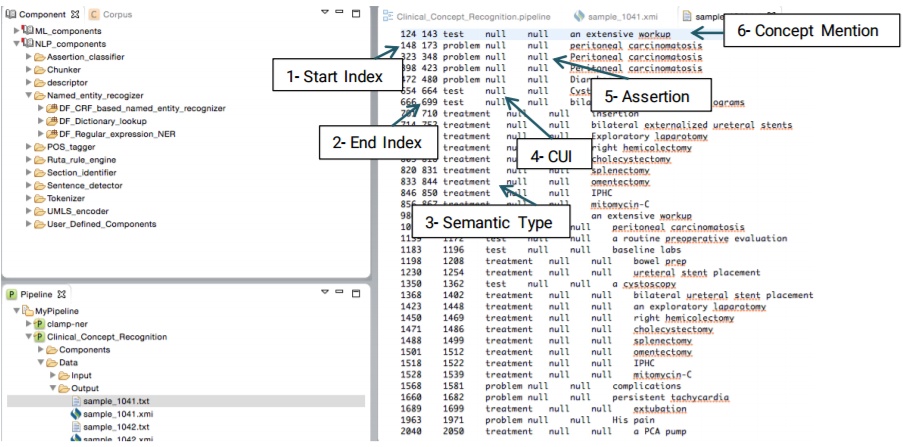
Clicking on a file with the .txt extension will display a view of tab delimited, detailed output information in a new window. As shown in the figure below, each line in the file illustrates the detailed information of one recognized clinical concept. The following information is included in a tab delimited output:
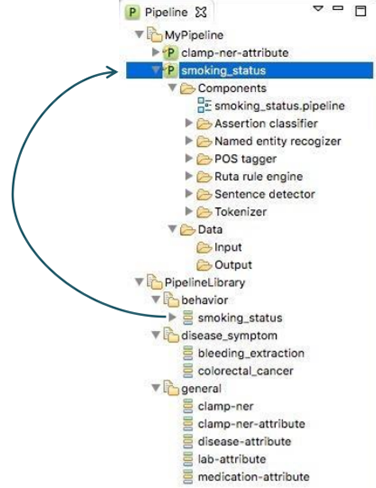
In order to facilitate a convenient utility of CLAMP, a series of pipelines that could be
directly adopted in common clinical applications are pre_built and displayed in
PipelineLibrary. Users can directly drag one of them (e.g., smoking_status,
) from the PipelineLibrary and drop it under My Pipeline (see figures below). The required NLP
components of these pipelines are already configured. CLAMP
allows you to customize each of these components to fit your needs.
First, you need to
import your files; for more information go to
"Import input files”
section.
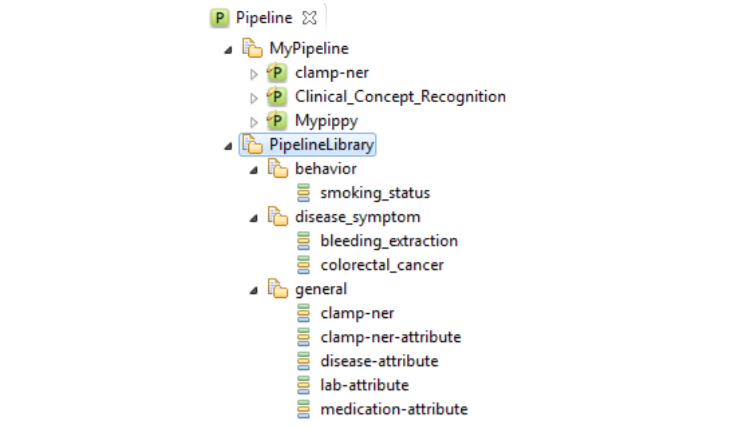
Depending on what your use case is, the current built-in pipelines are divided into the following categories:
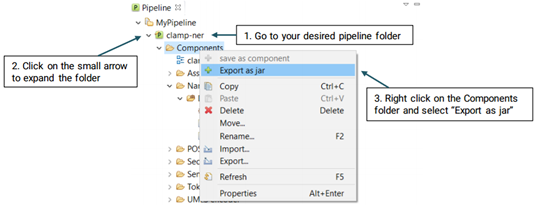
In order to export a pipeline as a jar file and use it in the command line version, please follow the steps below (See picture below):
The CLAMP annotation module enables you to annotate customized entities and specify relations between them in your desired corpus . These annotations enable you to assign additional clinical information to a selected text and develop an annotated corpus that’s more suitable to the specific task that you have. Task-specific models can be developed and used in the machine-learning modules of CLAMP or any other system of your choice. Before using this function, you need to:
After completing these steps, you will be able to annotate the imported files based on some predefined structure. The following steps will guide you on how to perform the steps mentioned above.
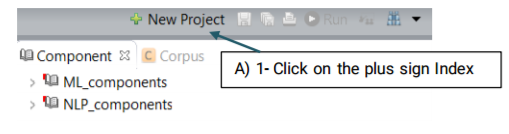
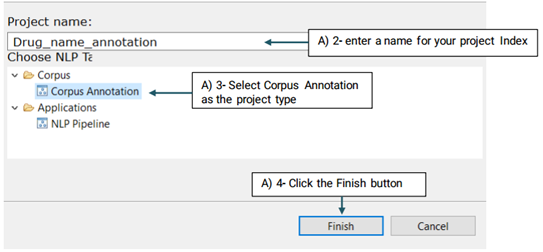
A new project with the name that you have specified is created and placed in the Corpus panel.
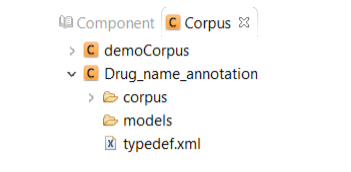
Double click the project name to view its content. The created project contains two main
folders:
Corpus: Contains the files that will be annotated
Models: Contains the machine learning models generated
from the annotated files.In
addition, the prediction results generated from
the n-fold cross-validation process and gold
standard annotations are included in this folder.
After you have created a project, follow the steps defined below to import the files that you want to annotate: (Please note that you can import the files to either train or test folders.)

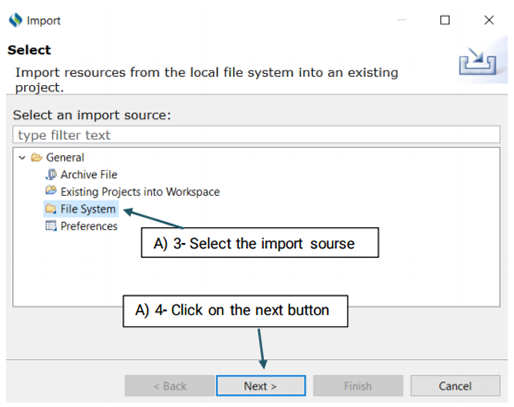
You also have three options to choose from:
Filter Types/ Select All/ Deselect All
Filter Types: Allows you to define the type of files that
will be imported. The only
extensions that you will work with in CLAMP are txt, and .xmi. For example,
you may only
want to import files with the .txt extension
Select All: Allows you to choose all displayed files
Deselect All: Allow you to deselect the files that have
already been selected
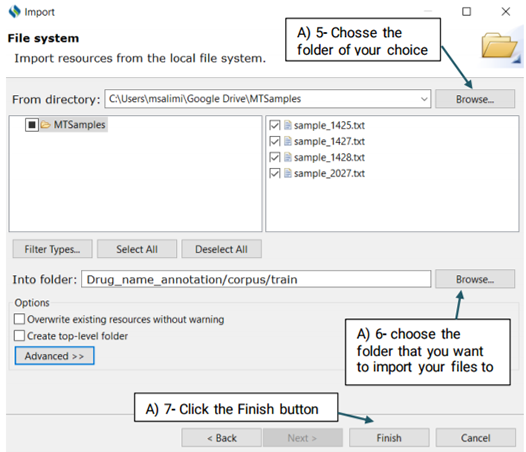
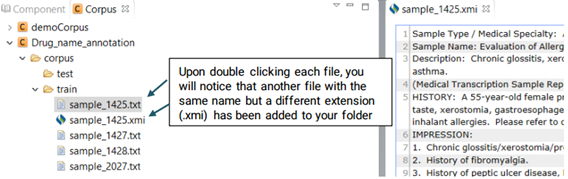
Now that the selected files have been imported to your desired folder, you can start annotating them. Double click on the files to open theim in the middle window and annotate them. Upon double clicking each file, you will notice that another file with the same name but a different extension (.xmi) has been added to your folder and displayed on the screen. This is the file type used by CLAMP for display and interaction purposes.
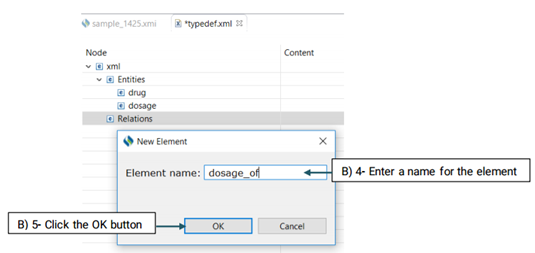
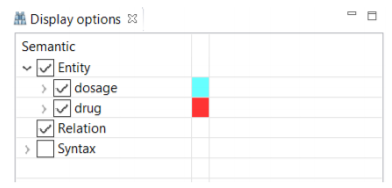
Before starting annotation, you need to define the semantic types that you will use for this purpose. Semantic types in CLAMP refer to entities(e.g, ‘problem/treatment/test’) and the relations between them.
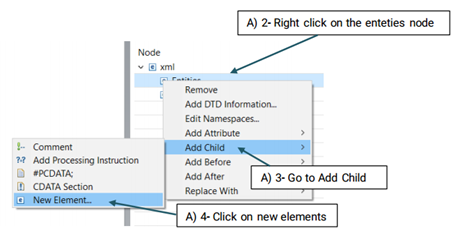

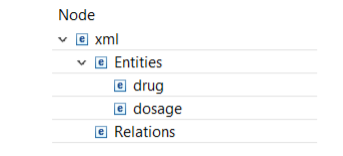
The created element will be added to the Entity node (See the picture below)
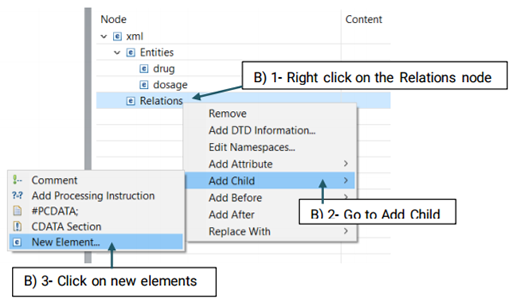
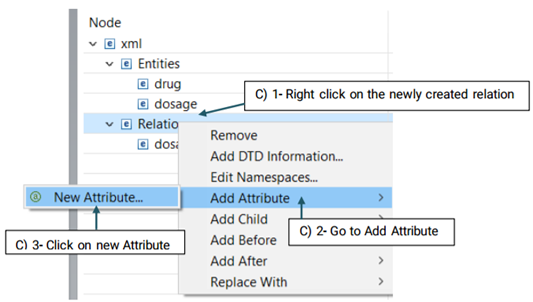
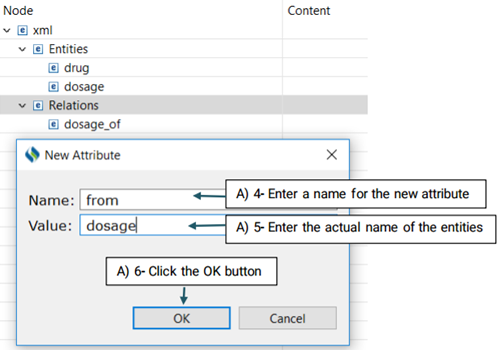
Then, you need to decide which entities are involved in this relation. There are two roles of arguments an entity can hold in a relation: From, and To. "From" refers to an independent entity while "To" indicates the dependent entity.
Now that you have set your desired schema, you are ready to start annotating your corpus.
First, open your desired .xmi file, then:
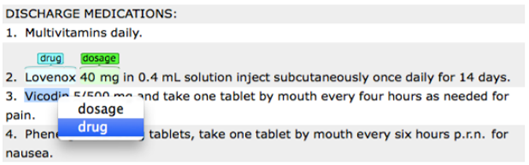
To assign entity:
Place your mouse over a word/phrase to highlight it and assign an
appropriate entity to the selected text.
Now that you have set your desired schema, you are ready to start annotating your corpus.
First, open your desired .xmi file, then:
To assign relation:
By dragging your mouse from an independent entity and dropping it to a
dependent entity, the names of possible relations will occur. Choose the appropriate
relation name by clicking on one of the displayed names.
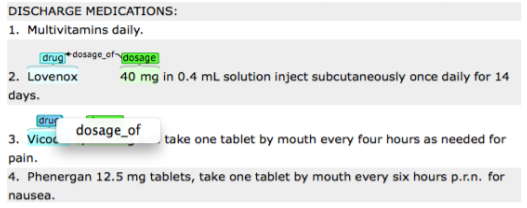
Please remember that you can only assign a relation to the entities that have already been
defined in that relation.
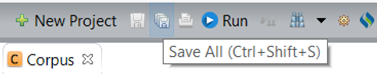
Once you have completed annotating the corpus, save your changes by clicking on the save
button at the top of the screen.
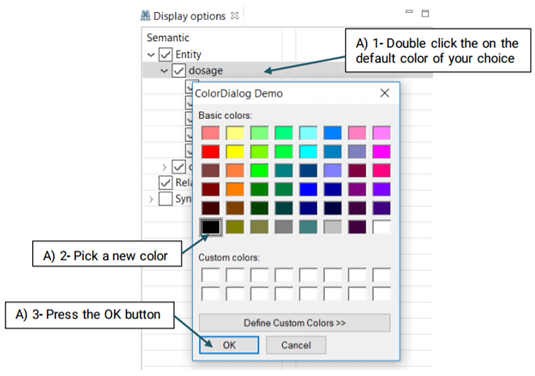
Although different colors are automatically assigned to the different items in the "Display Option", you are able to change them at any time.
As annotating a corpus from scratch may be a time-consuming and costly process, CLAMP offers an advanced feature called "pre-annotation" function which facilitates this process. The "pre-annotation" function relies on the existing models in CLAMP and is highly customizable.

Double click on the files to view their contents in a new window. As you can see in the figure below, the identified named entities in the file are already highlighted. Now you can start your own annotation.
Clamp enables you to build your own machine learning model based on a corpus that you
have already annotated or a pre annotated one that you have imported into a corpus
annotation project. The model can be used for predictions on new files. In the current
version of Clamp, CRF (Conditional Random Field) is used to build machine-learning model
for named entity recognition (NER).
The first step to build a Machine Learning model is to configure its schema. After
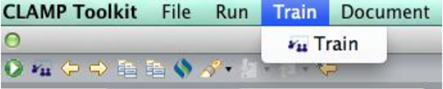
configuring the schema, you will be able to start running the training model and evaluation
processes. Once these processes are completed, you can view the generated model, its
associated log files, and named entities predicted by the model in the output folder. The
following steps will guide you on how to perform the steps mentioned above.
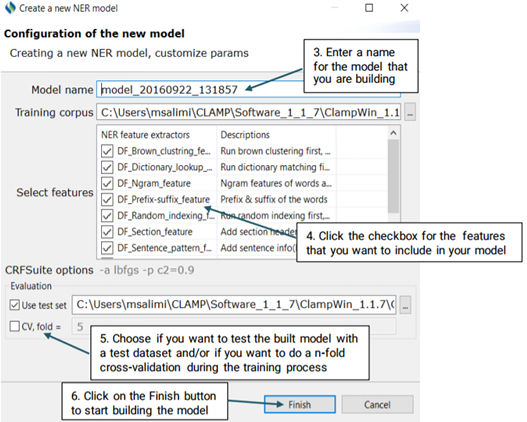
If you choose to test the model against a test set, make sure that you have your desired annotated xmi files in the folder of your choice. You can browse for the folder by clicking on the three dot button next to the checkboxes. With the n-fold cross validation, you are not required to do so as the training data will be used to test the model performance.
Once the building process starts, you can check the progress in the Console window,
as
well as the progress bar at the bottom of the screen. You can also stop the building
process at anytime by clicking the red stop button in the Progress window.
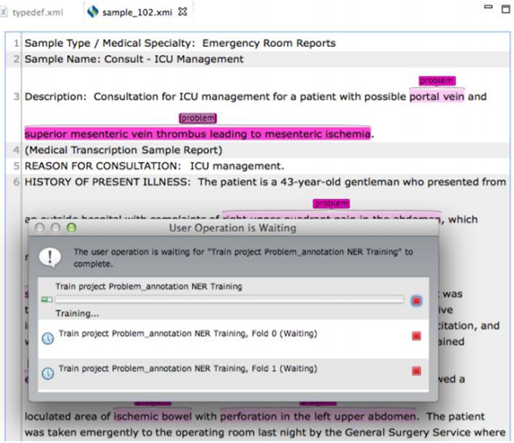
Note:During the model building process, the training files can not
be annotated. Clicking on
the text of the training files pops up an alert window indicating that the user
operation is
waiting for a function to complete.
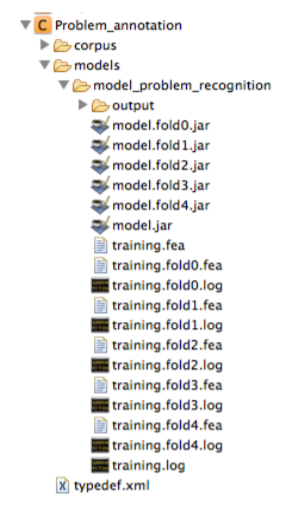
By default the built models, their associated logs, and the named entities predicted by each model (in the output sub-folder) are stored in the models folder. As shown in the figures below, the model built during n-fold cross validation and the model trained on the whole training set are also stored in this directory. The content of the log files includes the output information of the training process and the evaluation performance of each specific folder for cross validation.

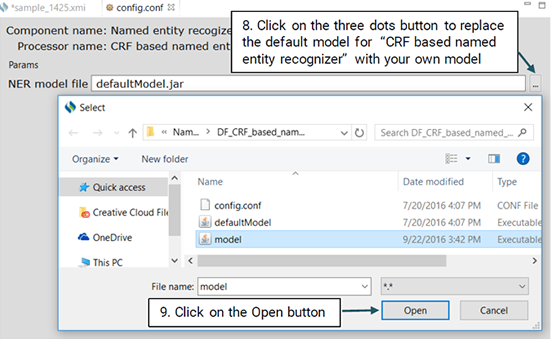
The steps below show how you should use your own model to recognize named entities:
You will be able to evaluate the performance of the NER model only if you have already
checked the checkbox(es) for “Use test set” or/and “CV, fold” when creating the model. For
more information on creating a new NER model, go to
Building machine learning models
section. Once the model is built, you can conduct an error analysis to compare the
goldstandard
annotations with the predicted ones (the annotations that are built based on the
model that you have specified).
To perform error analysis:
Double click on one of the .xmi files listed in the output folder of your choice on the
corpus
panel. This will open a new window where you can see the original text along with both
gold-standard and predicted annotations.
Please note that all named entities in both gold-standard and predicted annotations are listed on the "Display Options" panel. You can choose which named entities to be highlighted in the text file and assign different colors to them as described in "Visualization of entity and relation types" section.
Center for Computational Biomedicine
School of Biomedical Informatics
The University of Texas Health Science Center at Houston
7000 Fannin St, Houston, TX 77030
License Support
Hao Ding - Director of Operations
713-208-8195
Jianfu Li - Research Scientist
713-500-3934